
The idea of being tight on time has been pretty much beaten to death around here. But I feel like it has been for good reason. Getting more than about an hour of solid creative time doesn’t really happen around here much. Heck, even an hour alone to make something is elusive. But I know I am not alone on that. So over the past few months as life with a new baby has rearranged every pattern we established, I have been brainstorming ideas about how to get real, meaningful amounts of work done in really awkward pockets of time. So today, I bring you one of the ideas I have been working on: step at a time paintings.
Okay, I am not going to blow anyone’s mind here, but I have been having pretty good luck with staying motivated this way, so I wanted to share. The basic idea is that instead of getting bogged down by trying to plan some giant super painting or complete idea, you just decide on a number of steps. Just pick a number. That is going to be the number of layers your painting will have. This can be a number that either leads to a completed work or a background for a more detailed piece, it’s up to you. The whole point is that if you are feeling stuck, having something concrete (a number) maybe help you unblock and at least take a few steps forward. But what are you supposed to do with each number? It’s simple…you just do one thing. You do a color wash, stamp, add texture, just something. The key is you do it fast and don’t think too hard.
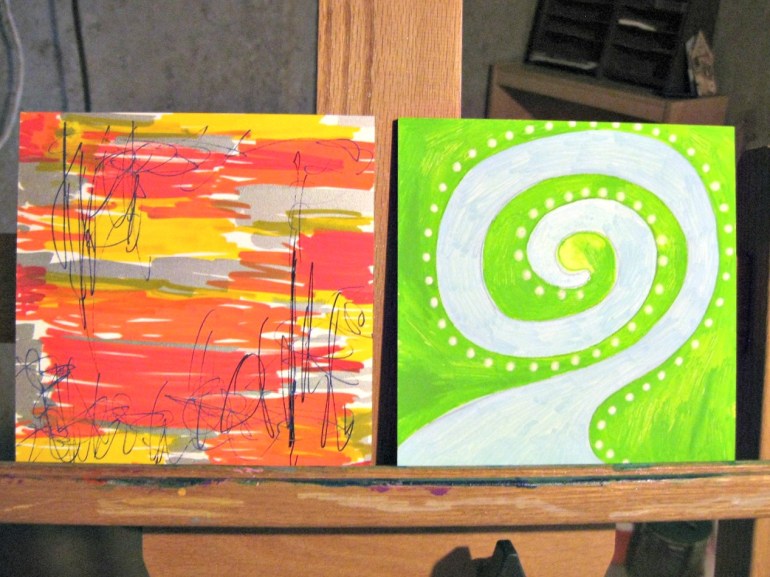
Still a bit confused? That’s okay, I made visual aids! For the purposes of this tutorial, I started with seven. Seven layers to create. Remember, the whole idea is to do it your own way, so you don’t have to do the same number or same techniques in the same order. You just have to do. So check out my process and finished results.
Layer 1: Just a little pattern
I really did not think at all for this layer. No concerns about the final product, no stressing, planning, over thinking. You know, the things I usually do. I grabbed two small gesso boards and the Montana acrylic markers my husband got me for Christmas. And I drew. The great thing about those markers is they dry fast, so I didn’t have to worry as much about smudging my work. Since I was working on both pieces at the same time, I chose totally different color schemes in the hopes they would end up looking a bit different.
Layer 2: Adding texture


For the red painting, I used craft foam embossed with a pattern resembling snake skin. I simply dabbed on purple paint and pressed it onto the board. For the green board, I mixed some blue paint with acrylic modeling medium and applied a slightly thick layer to the board. I then used a Catalyst wedge to drag a pattern throughout. Because of the paste, this pattern is actually a low relief you can feel when you run your hands over it. On both boards, I chose colors that had good contrast against the existing background.
Layer 3: Papers


Lucky me, I have a largish stash of paper goods! That includes a small box with hundreds of paper samples of every imaginable variety. I pulled out a white mesh with gold chain stitch swirled throughout. That one got cut into strips and put on top of the red board. Besides decorative papers, I also have my share of tissue paper. I used a basic white, crumpled up to add even more dimension to the blue and green board. For both pieces, I adhered the papers with full-strength matte medium. I looooove that stuff because it holds so well without warping and wrinkling papers.
Layer 4: Draw and splat or stamp


I didn’t want every single step to match every time, so here I took a different path for each piece. On the red board, I drew a few spirals with my orange paint marker. Super simple. But maybe too simple. So I dropped straight fluid acrylic in bright green from about a foot up. I love how paint splatter looks, and I love finding new ways to incorporate and manipulate them. On the green piece, I wanted to echo the diamond patterns I had created with the modeling medium. I have a stamp I carved with a repeating diamond pattern, so it was pretty much meant to be. I used the purple and blue portion of my rainbow stamp pad to randomly place a few clusters of diamonds. So they were getting a bit more interesting, but I have to get to seven still…
Layer 5: Draw


This layer is probably the most subtle. I used my paint markers to add a few tiny details. Outlining paint splatters on one, outlining diamonds on the other. As much as I love splatter, I love outlining them even more. That’s normal, right?
Layer 6: A spray of paint and texture meets pattern

The addition to the red canvas is so subtle, I had to really look to recall what I did! I was adding a really fine splash of purple to another painting, so I did a little bit to this one as well. You can see it the best in the upper left part, but there are pinpoint-sized dots of purple popping all over this painting. I probably don’t need to tell you what I added to the other piece. Yes, more diamonds. Yes, bright yellow. But I did both those things with crackle paste. That stuff is so fun. If you have never tried it, you really should. When applied thick (like in this case), it gets these big, fat cracks that show the under layer nicely.
Layer 7: Cutouts


I wanted something really high contrast on both pieces, but they have a lot of color and other elements going on. So what to do? Black and white, naturally! I took some favorite doodles, transferred them to watercolor paper, cut them out and accented with markers. Another generous coating of matte medium, and the last layer was done!
So what does it all mean?
Just try to take the pressure out of what you are creating. If you are feeling stuck, sometimes a new exercise or perspective on your work can help out. If you want to jump in and try Step at a Time painting, here are a few different ideas for what you can do with each layer:
- Scribble: this is just plain fun
- Transparent glaze: adding lots of layers of transparent color can create a wonderful glow to a painting
- Texture: bubble wrap, embossed foam, specialty papers, the possibilities are endless
- Collage: all sorts of different papers can be layered in…magazine pictures, tissue scraps, ticket stubs
- Stamp: store-bought or hand-carved
- Resist: shapes created with masking tape or rubber cement will resist water-based colors
- Remove: sand or scratch away layers to reveal colors buried underneath
- Details: use fine point pens to add interest
- Accent: add on larger 3d items to create new focal points
- Build: use acrylic additives to create real dimensional texture
Next time you are feeling stuck, give this a try. You never know what will happen!
